
Mac, iPhone and iPad
Echorie Help
Record, edit and share your audio, and play it anywhere.
Echorie 1.0 · the songs, artists and projects in the pictures are made up
Features marked Premium are part of Echorie Premium on the Mac. Everything else is free.
Getting started
Echorie records the sound your Mac plays, from a stream, a call, a game or any app, and lets you turn it into songs and playlists. Edit recordings on a timeline, save them as songs, and play them on your Mac or, through iCloud, on your iPhone and iPad.
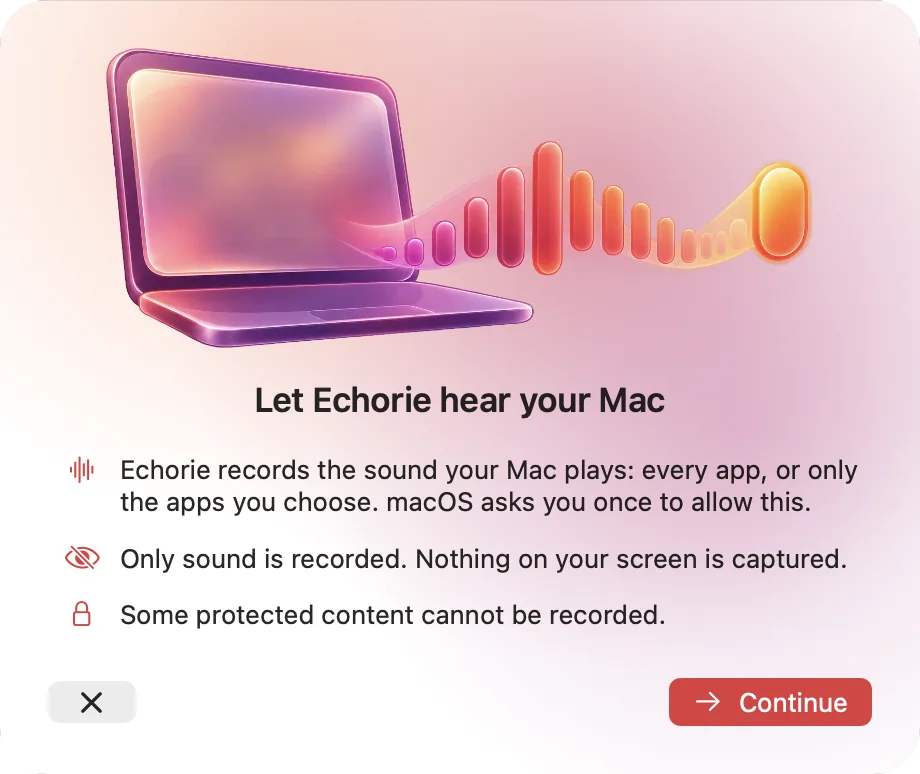
Allow recording
The first time you record, macOS asks to let Echorie record system audio. Open System Settings ▸ Privacy & Security ▸ Screen & System Audio Recording and turn Echorie on under System Audio Recording Only. macOS may ask you to quit and reopen Echorie. Only sound is recorded: nothing on your screen is captured.
Finding your way around
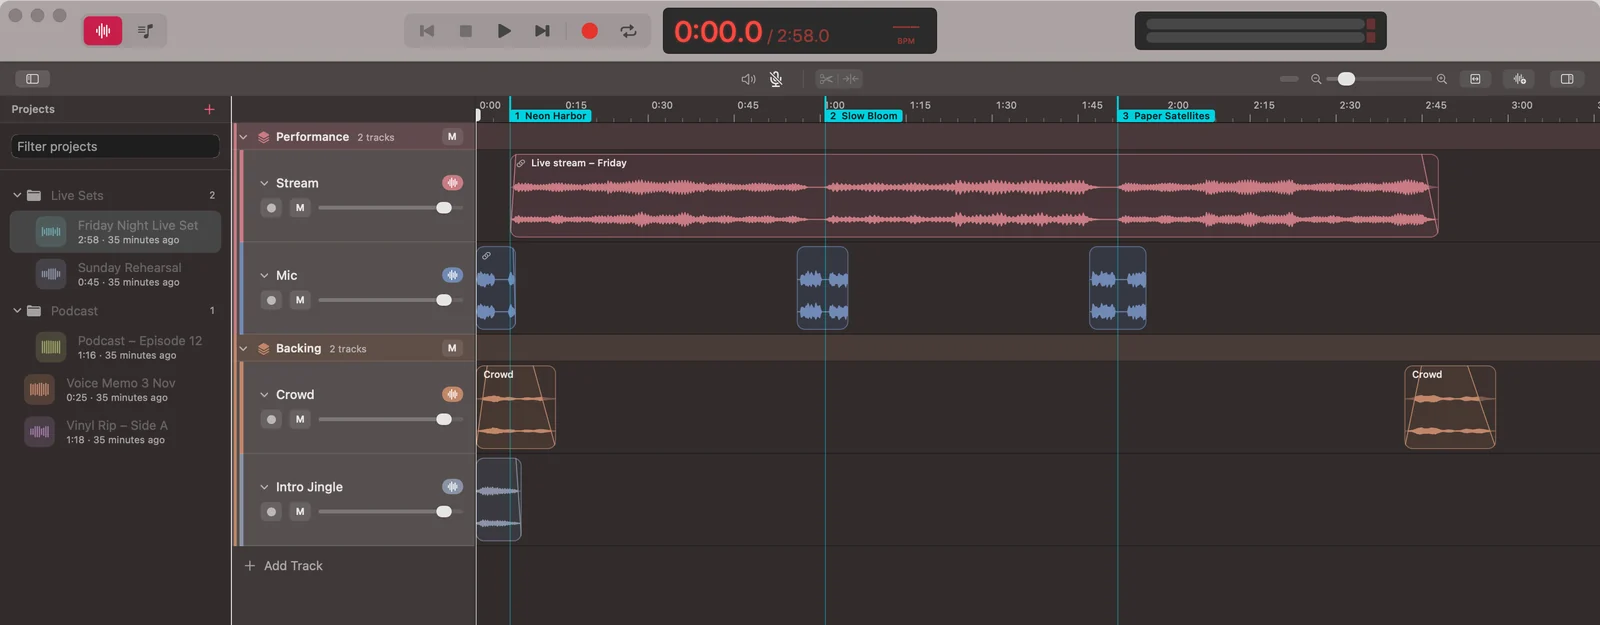
The window has two areas. The Editor (⌘1) holds your projects: recordings on a timeline, to cut and arrange. The Player (⌘2) holds your songs and playlists. Switch between them with the two buttons at the top left.
The top bar also holds the transport (go to start, stop, play, go to end, record and loop), the time display, the level meter and, until you have Premium, the Upgrade button.
Tip: closing the window keeps Echorie running, and music and recordings keep going. Click Echorie in the Dock, or press ⌘1 or ⌘2, to bring it back as it was.
Recording
Press the red Record button or ⌘R to start, and again to stop. A level meter in the top bar shows what is coming in.
- With no project open, the recording becomes a new project.
- With a project open, it goes onto the track whose record button is lit (the armed track), at the playhead, or onto a new track. If there's already audio where it would land, Echorie asks before recording over it.
Choosing what to record
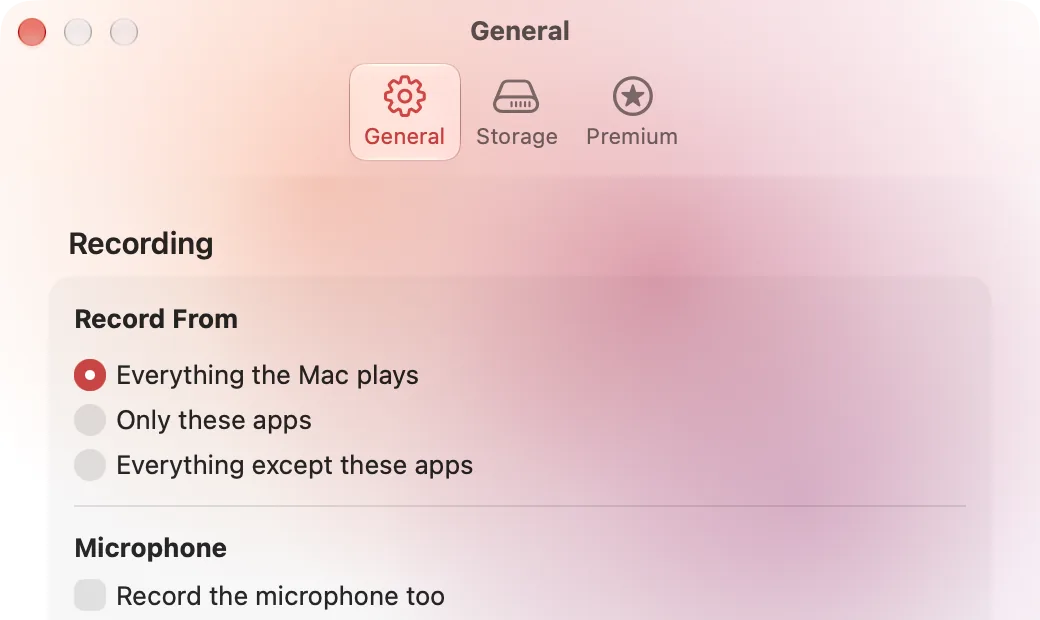
The button next to Record chooses where sound comes from:
- Everything the Mac plays, the default.
- Only these apps Premium: tick the apps to record, such as a browser for a stream.
- Everything except these apps Premium: leave out notification sounds or a music app.
Apps that start playing during a recording are picked up as they do. The same choices are in Settings ▸ General.
Microphone
Turn on the microphone button to record your voice too. It goes onto its own track, right below the recording and lined up with it, so you can set its level separately. Choose which microphone in the same picker. Use headphones so the microphone doesn't pick up what you're recording. Without Premium the microphone records up to 5 minutes at a time; the Mac's sound keeps recording.
Instant Replay Premium
Missed the start of something? With Instant Replay on, Echorie keeps the last 30 seconds to 5 minutes of what played, in memory only, never written to disk unless you save it. Press ⇧⌘R (File ▸ Save Instant Replay) to keep it. While it's on, macOS shows that Echorie is recording system audio.
Some protected content, like certain streaming video, can't be recorded; macOS gives it to Echorie as silence.
Projects
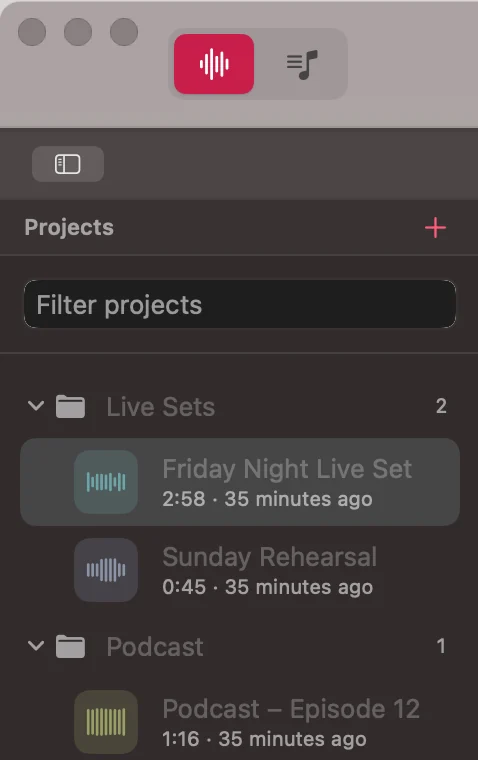
Every recording or import becomes a project, listed on the left of the Editor (show or hide the list with ⌥⌘P). Click one to open it; Echorie saves as you go, so there is no Save button for projects.
- New Project and New Folder are in the File menu. Drag projects onto folders to file them; folders can hold one level of folders.
- Filter projects with the search field at the top of the list.
- Import audio with ⌘I or by dropping files onto the window; each file becomes a project, or drops onto the timeline where you let go.
- Rename or delete a project from its right-click menu. Deleting a project also deletes the recordings only it uses.
Without Premium you can keep 10 projects at a time, with up to 16 tracks each. With Premium there's no limit on projects, and up to 64 tracks each.
Editing
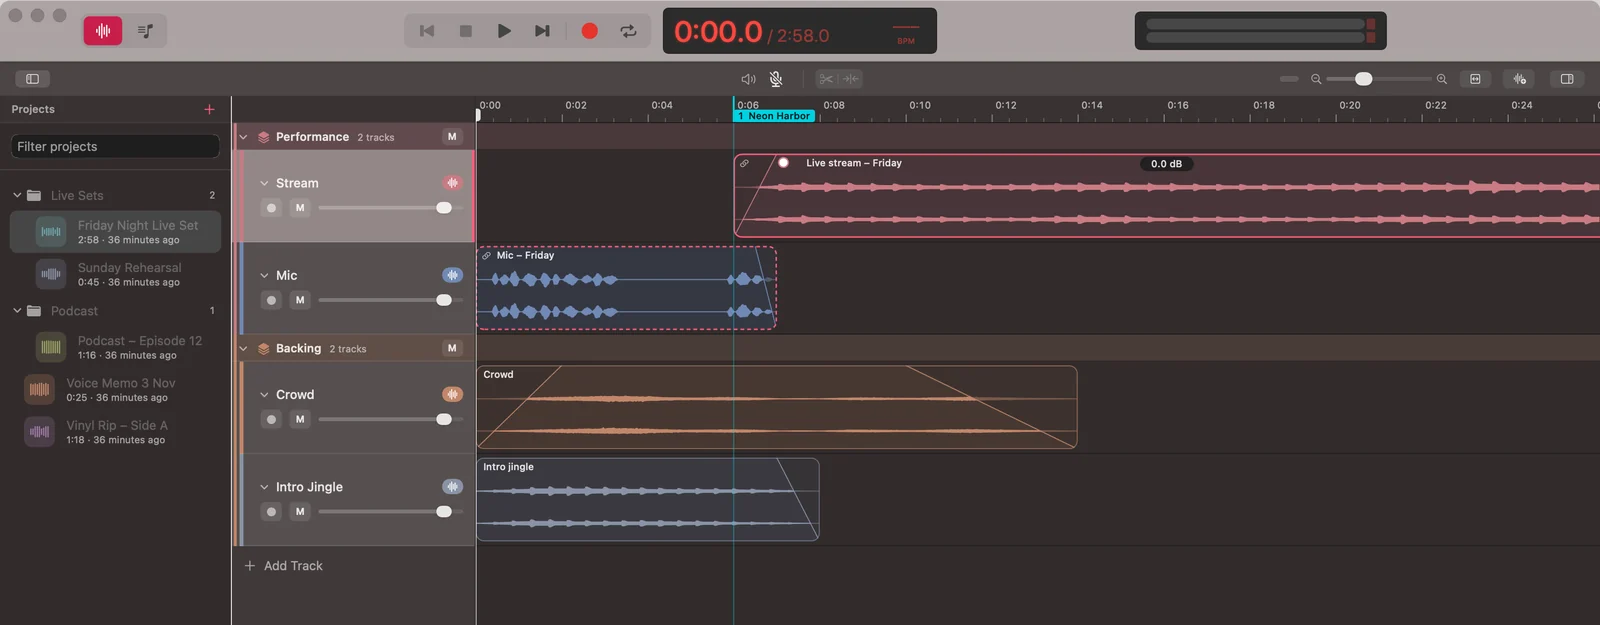
A project holds tracks, and tracks hold clips: pieces of your recordings placed in time. Editing never changes the recordings themselves, and every change can be undone with ⌘Z.
Moving around
- Zoom with ⌘= and ⌘−, pinch on the trackpad, or the slider in the bar above the timeline. ⌘0 fits the whole project.
- Move the playhead by clicking or dragging on the ruler, with ← and → (⇧ for bigger steps), and Return to go to the start.
- Snapping lines clips up with each other and the playhead. Turn it on or off in the bar above the timeline, or hold ⌘ while dragging.
Clips
- Move a clip by dragging it, to another time or another track. Drop it below the last track to put it on a new one. ⌥← and ⌥→ nudge it.
- Split the selected tracks at the playhead with S or ⌘B, or hold ⌥ and click a clip where it should be cut.
- Trim by dragging a clip's left or right edge.
- Fade in or out with the round handles at a clip's top corners. Right-click a fade to choose its curve: linear, equal power, exponential or S-curve.
- Gain: drag the pill in the middle of a clip up or down; double-click to reset. Normalize in the clip's menu sets the level so the loudest moment sits just under full scale.
- Double-click a clip for its settings: name, gain and fades.
- Join clips with ⌘J, mute just the selected clips with ⌃M, and delete them with Delete.
- Link clips on different tracks with ⌘G Premium so they move together, like a recording and its microphone. ⇧⌘G unlinks.
Tracks
Add a track with ⌥⌘N or the Add Track button below the tracks. Each track's header holds:
- the record button, which arms the track for the next recording;
- M to mute it (⇧-click mutes every other track instead);
- a volume slider, and its color on the left edge;
- a fold arrow that shrinks it to a slim bar (⌥-click folds every track).
Drag a header up or down to move the track, and drag its bottom edge to make it taller. Right-click it for Info (title, artist and more, used when it's saved as a song), Rename, Color, Split into Songs, Export and Delete Track.
Groups
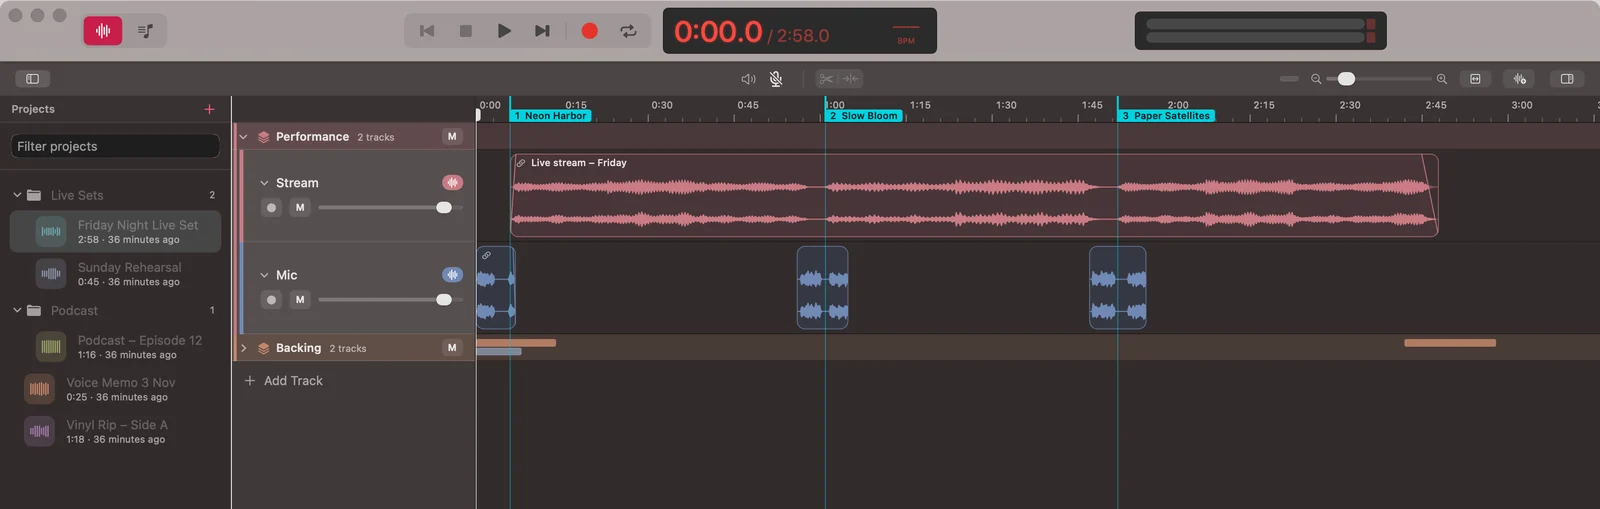
Select several tracks (⌘-click or ⇧-click their headers) and press ⌥⌘G to group them under a named, colored header. Click the group's header to select all its tracks; its M mutes them all; its arrow folds the whole group into one row that still shows where its clips are. Drag the header to move the group, or drag tracks in and out of it. ⇧⌥⌘G ungroups. Making groups and adding tracks to them is part of Echorie Premium; groups you already have keep working without it.
Ranges Premium
Drag across empty space in the tracks to select a stretch of time on the tracks you cross; a tag shows where it starts, ends and how long it is. ⇧-drag to change it, Escape to clear it. Then:
- Delete removes what's inside on those tracks and leaves a gap.
- ⌘Delete removes the range from every track and closes the gap, so everything after it moves up, markers included. Ideal for cutting an ad or a long pause out of a recording.
- Timeline ▸ Range also has Insert Silence, Keep Only Range, Split at Range, and (free) Loop Range and Zoom to Range.
Strip Silence Premium
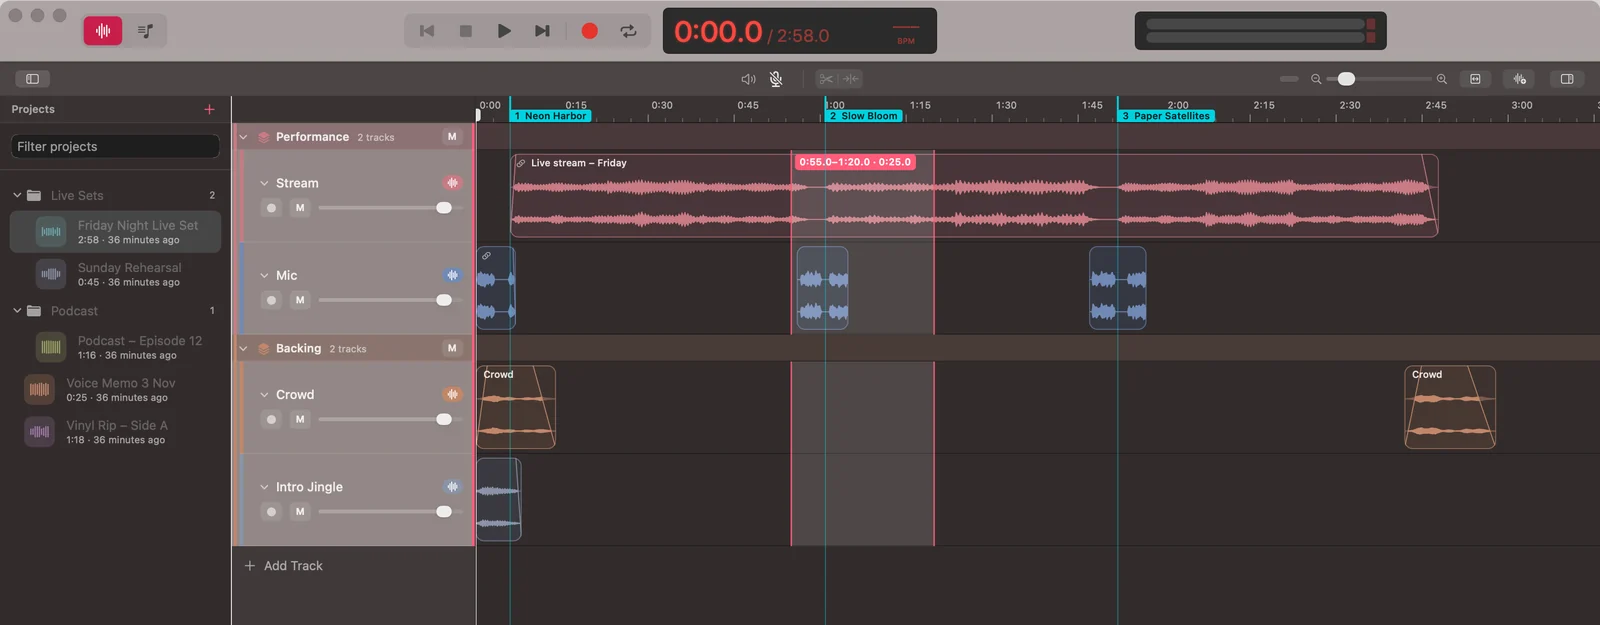
Timeline ▸ Strip Silence… removes the quiet parts of the selected clips, or of every clip on the selected tracks. Set how quiet and for how long a stretch must be to go, and how much to keep around the sound so words and notes don't get clipped. The parts that would go are shaded on the timeline before you confirm. With everything on one track you can also close the gaps.
Crossfades Premium
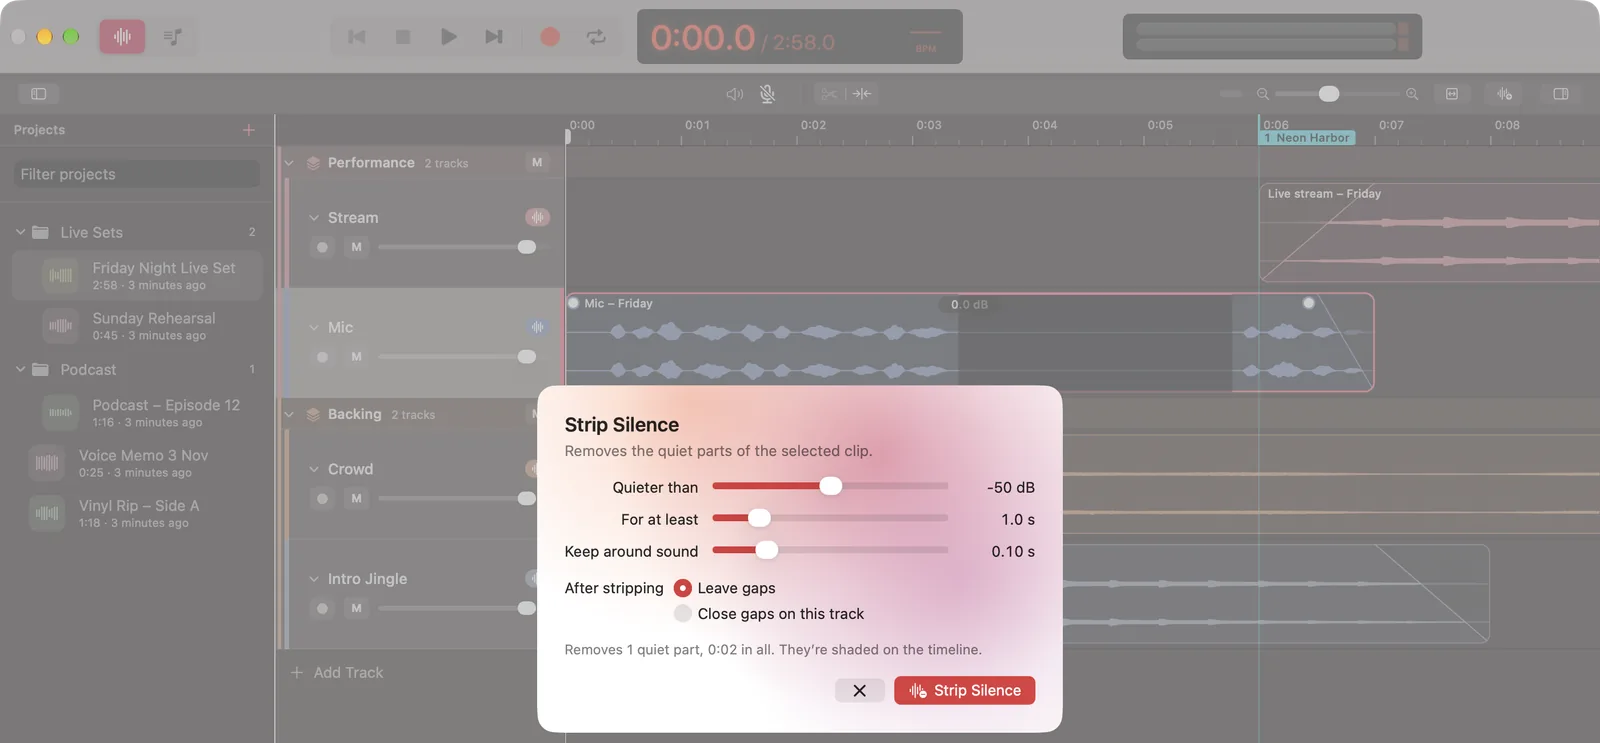
When two clips overlap on a track, select one and choose Timeline ▸ Crossfade to blend them over the overlap; the crossing fade lines show it. With Crossfade Overlaps Automatically on, moving or trimming a clip onto another does it for you.
Every edit is protected against clicks: where a clip's edge cuts into the middle of a recording, Echorie fades it over a few milliseconds you won't hear. This is on for everyone.
Clean Up Voice Premium
Right-click clips of speech and choose Clean Up Voice ▸ Light, Standard or Strong. Background noise comes out, harsh “s” sounds are softened and the level evens out. The original stays in Sources, and Undo brings it back.
Combining tracks Premium
Select tracks and choose Timeline ▸ Combine ▸ Combine Selected Tracks to mix them into one track, or Combine into New Track to keep the originals, muted, beside the mix.
Looping
Press L or click the loop button to loop. ⌥-drag on the ruler to draw the loop, drag its edges to change it, or choose Control ▸ Loop Selected Clips (⇧⌘L). With the loop on, Stop goes to the loop's start, and again to the very start.
Snapshots Premium
⌘S saves a snapshot of the project as it is now, to try things and go back. File ▸ Snapshots… (⇧⌘S) lists them: restore one (your current version is kept as a snapshot first) or open it as a project of its own. Restoring and opening are free.
Sources and transcripts
⌥⌘S shows Sources: every recording and import, to drag onto the timeline again. ⌥⌘T transcribes the selected clip or song into text, on your Mac; ⌥⌘I shows the transcript, to read, copy or export.
Songs and markers
A long recording often holds several songs. Echorie can split it in two ways:
- Split into Songs: right-click a track ▸ Split into Songs ▸ Split Automatically cuts it at the breaks between songs and puts each song on its own track, to edit them one by one.
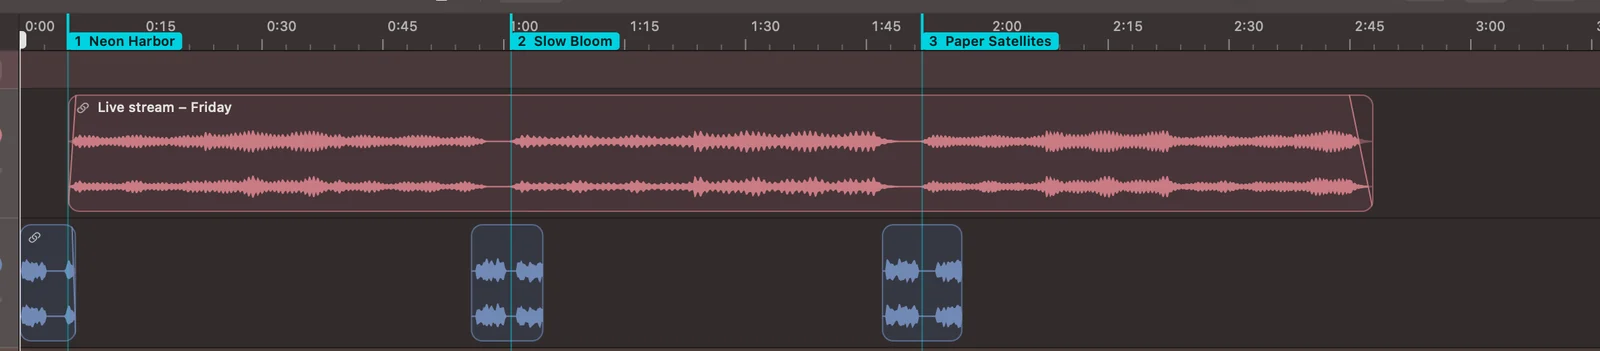
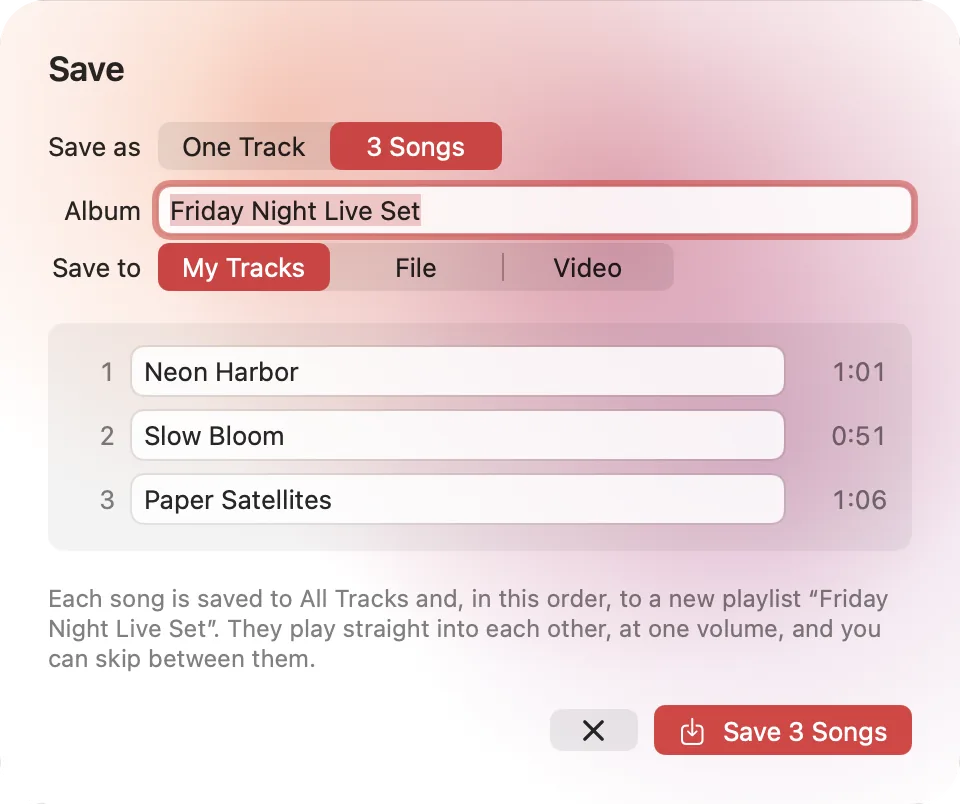
- Song markers Premium (⇧M, or right-click the ruler) mark where each song of the finished mix starts, across all tracks. Save then makes an album: one song per marker, flowing into each other without a gap. Double-click a marker to name its song.
Saving and exporting
- Save (⌘E) mixes the project into a song in the Player, with a title, artist, album and artwork. With song markers it saves an album of separate songs Premium.
- Export Tracks (⇧⌘E) writes tracks as audio files (M4A, MP3, WAV or AIFF), one file per track, mixed into one file Premium, or split at song markers Premium.
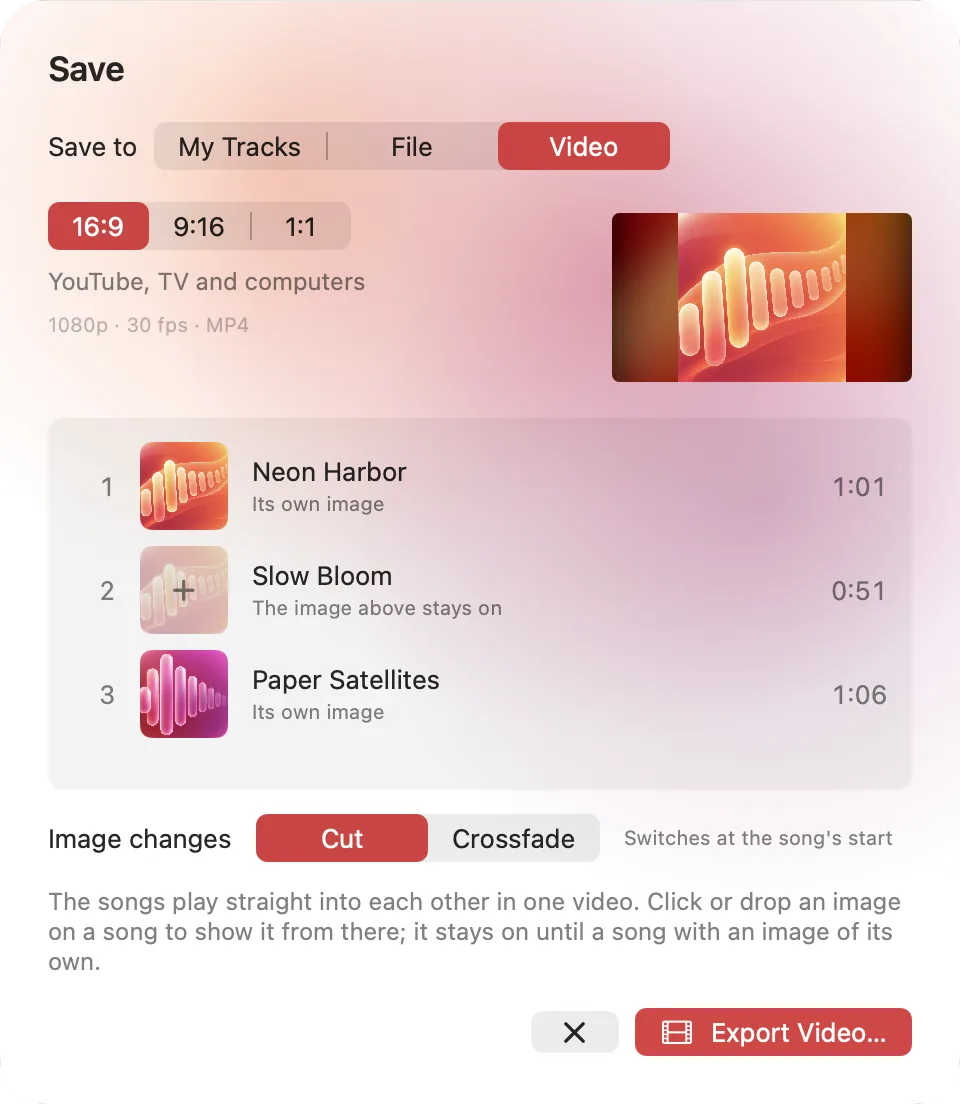
- Export as Video makes an MP4 music video: an image for each song, cut or crossfaded between songs, with chapters. Without Premium the video carries a small “Made with Echorie” mark.
- Add Tracks to Playlist… puts tracks straight into a playlist as songs.
The Player
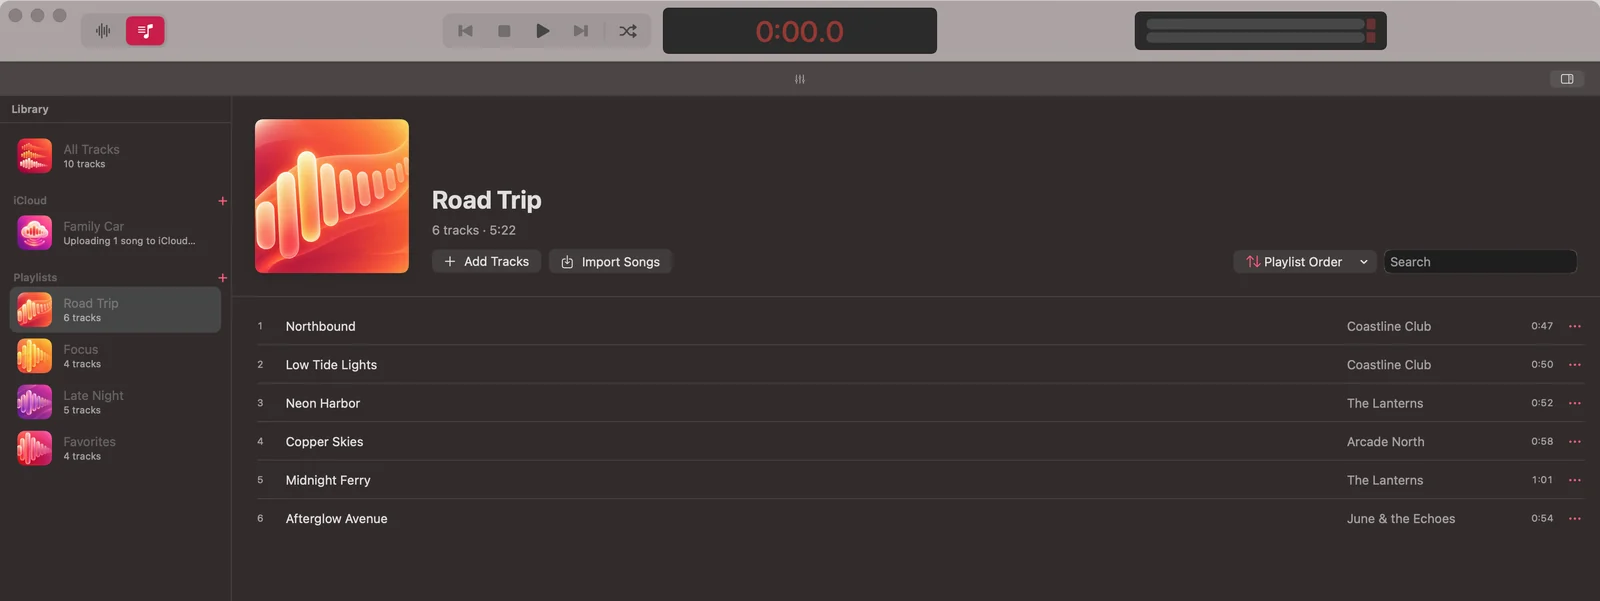
All Tracks holds every song you saved or imported; your playlists are listed below it.
- Add songs by dragging them onto a playlist in the sidebar (⌥ copies instead of moving), or by dropping audio files from the Finder onto a playlist or the list.
- Play with a double-click or Return. Songs play back to back with no gap, so albums that flow into each other stay seamless.
- Sort a playlist by its own order, date added, title or length. Drag songs to reorder in its own order.
- Shuffle plays in a random order. Under a playlist's Info you can pin songs to always play first, last or at a set place when shuffled.
- Even Out Song Volume (Control menu) plays every song at about the same loudness without changing the files. The equalizer has presets and a custom curve.
- Right-click a song for Info, Export, Transcribe and more. Delete removes songs from a playlist; in All Tracks it deletes them, after asking.
Shared playlists and iCloud
A shared playlist syncs through your iCloud account to Echorie on your iPhone, iPad and other Macs. Create one with File ▸ New Shared Playlist…, then drag songs onto it. Each song is copied in and made smaller for iCloud; the original stays as it is.
- Quality: Compact (the default, smallest), Standard or High, in Settings ▸ General. Songs already uploaded keep the quality they were made at.
- Status: each song shows whether it's compressing, waiting, uploading or in iCloud. On your other devices a ring shows each song downloading.
- Changes to a shared playlist on one device (songs added, removed, reordered, renamed) appear on the others.
Shared playlists need you to be signed in to iCloud on each device with iCloud enabled for Echorie. Everything else in Echorie works without iCloud.
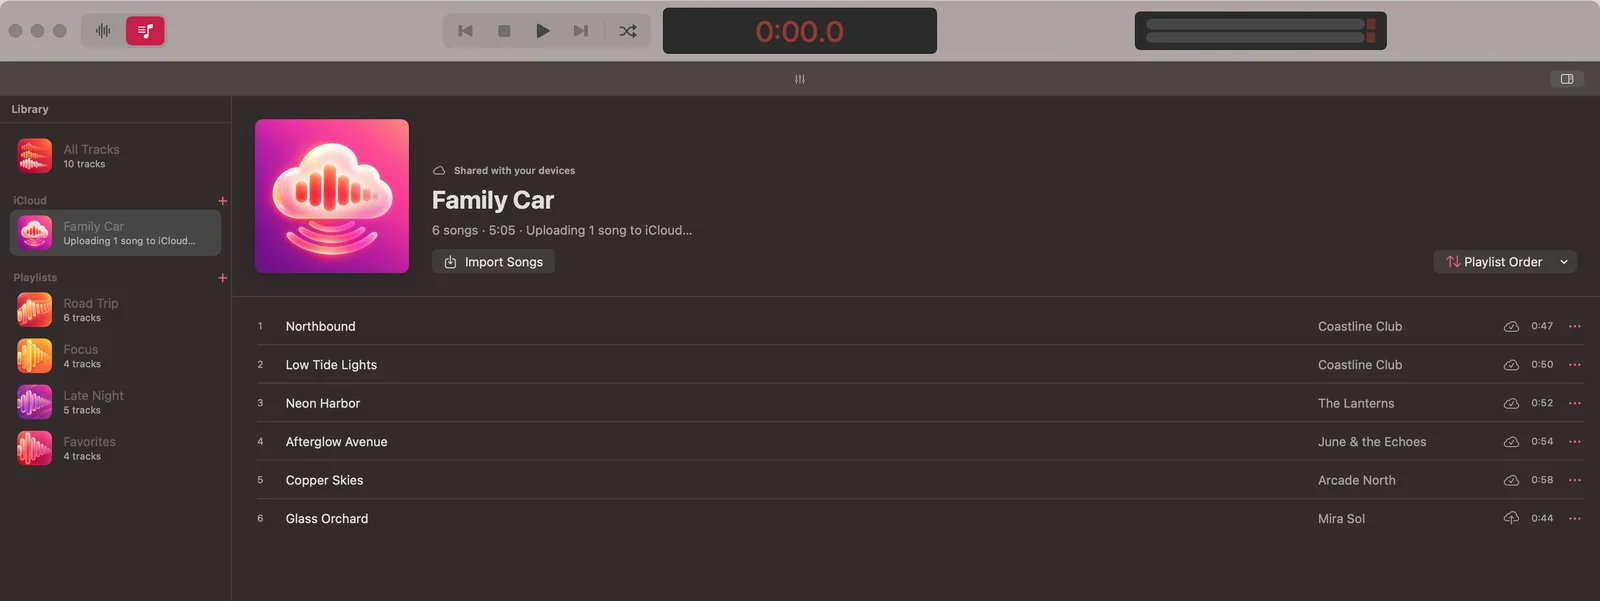
On iPhone and iPad
Echorie for iPhone and iPad is free. It plays your shared playlists and records with the microphone. Most of it explains itself; here are the essentials.
Playlists
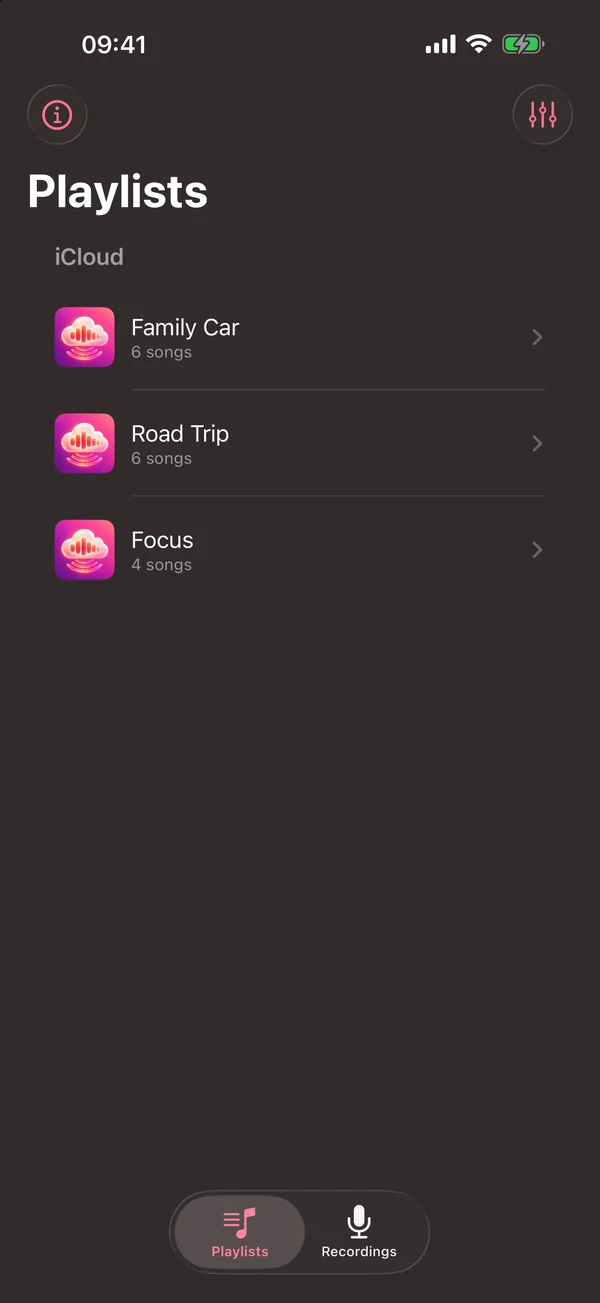
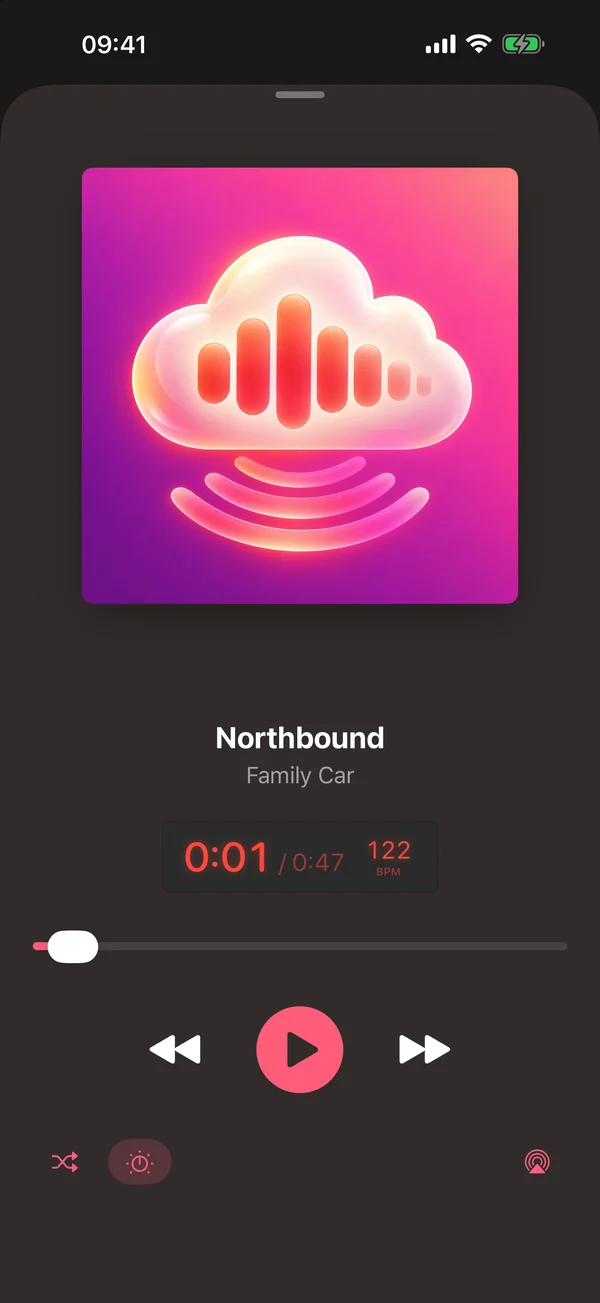
The Playlists tab lists the shared playlists from your Mac (they appear by themselves once iCloud has them) and the ones you make on the phone. Songs download as needed; tap one to play. The player at the bottom opens to the full Now Playing screen with shuffle, AirPlay, the equalizer and Even Out Volume.
Recordings
The Recordings tab records with the microphone. Tap Record to start and stop; a recording is saved as it goes, so nothing is lost if the app is closed. Tap a recording to rename it, trim its start and end, or add it to a shared playlist, which also brings it to your Mac. The gear opens Recording Settings: Hold to Stop (so a stray tap doesn't end a recording) and the iCloud quality.
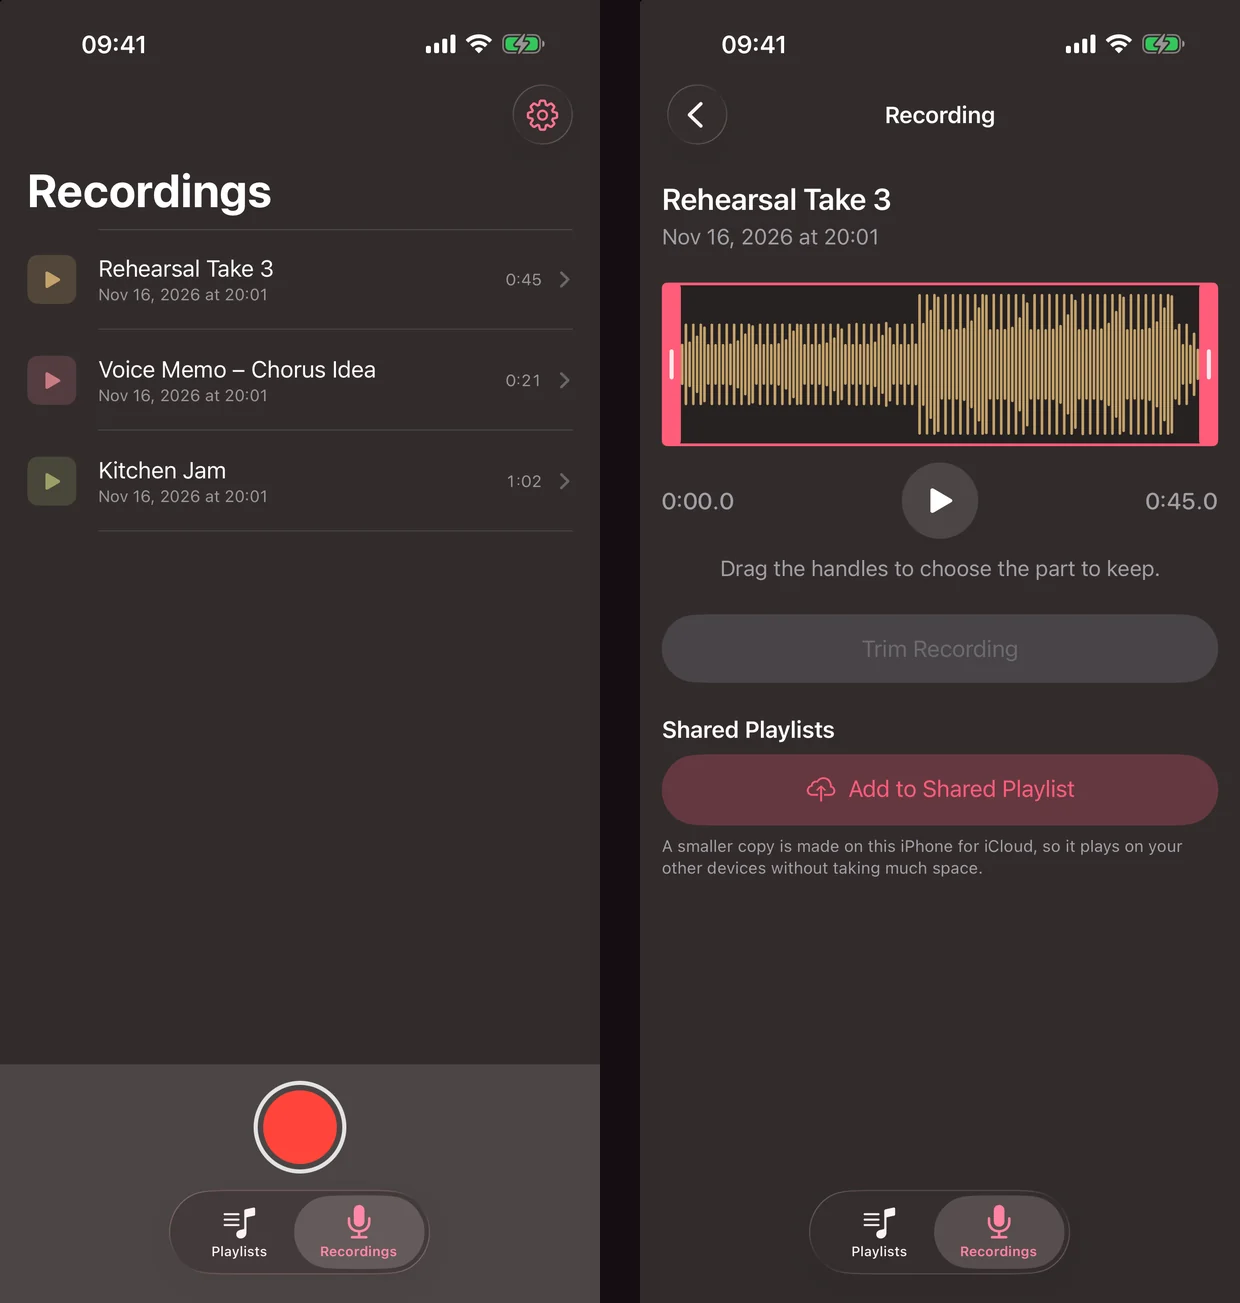
On iPad it all works the same, with more room.
Settings
Echorie ▸ Settings… (⌘,) has three tabs:
- General: what new recordings take in, the microphone, Instant Replay, Even Out Song Volume, the iCloud quality and the transcription language.
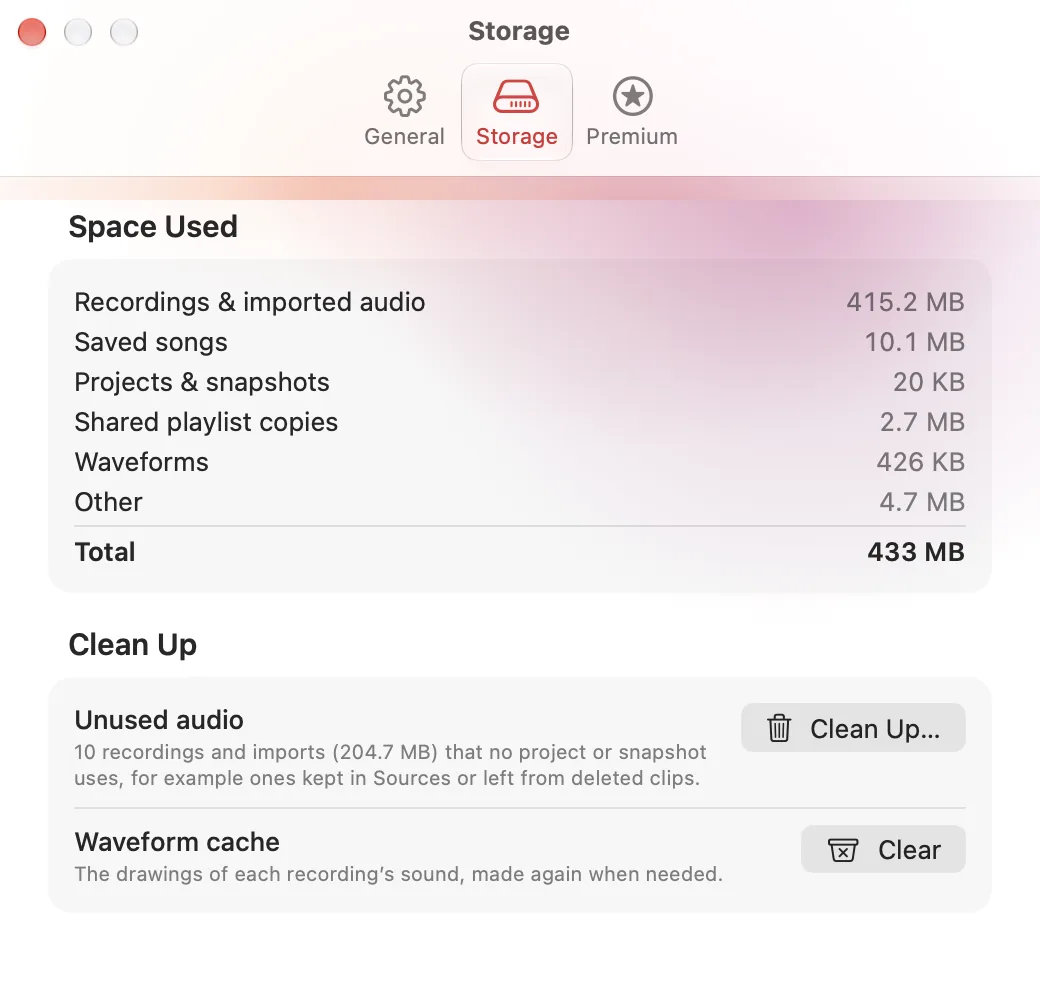
- Storage: where the library is (Show in Finder) and how much space recordings, songs, projects and shared copies use. Clean Up moves recordings that no project uses to the Trash, after asking; Clear empties the waveform cache, which is rebuilt as needed.
- Premium: your plan and renewal date, Manage Subscription and Restore Purchases.
Echorie Premium
Recording, editing, saving and playing are free, on the Mac and on iPhone and iPad. Echorie Premium, on the Mac, adds:
- Unlimited projects, up to 64 tracks each
- Choosing apps to record
- Long microphone recordings
- Instant Replay
- Range editing
- Strip Silence
- Crossfades
- Clean Up Voice
- Linked clips
- Track groups
- Combining tracks and songs into one
- Tempo detection
- Project snapshots
- Song markers and albums
- Music videos without the mark
Choose Upgrade in the top bar, or try any Premium feature, to see the plans: monthly, yearly with the first month free, or a one-time lifetime purchase. Restore Purchases is in the Echorie menu and in Settings ▸ Premium. Subscriptions are managed in your App Store account.
Keyboard shortcuts
Help ▸ Keyboard Shortcuts (⌘/) lists them in the app too.
Everywhere
| ⌘R | Record or stop |
|---|---|
| ⇧⌘R | Save Instant Replay |
| Space | Play or pause |
| ⌘1 / ⌘2 | Editor / Player |
| ⌘I | Import audio |
| ⌘N | New playlist |
| ⌘→ / ⌘← | Next or previous song |
| ⌘↑ / ⌘↓ | Volume |
| ⌥⌘T | Transcribe |
| ⌥⌘I | Show the transcript |
| ⌘, | Settings |
| ⌘/ | All keyboard shortcuts |
Editor
| Return | Go to the start |
|---|---|
| ← / → | Move the playhead (⇧ for bigger steps) |
| S or ⌘B | Split at the playhead |
| ⌥-click | Split a clip where you click |
| ⌘J | Join clips |
| ⌃M | Mute the selected clips |
| ⌘G / ⇧⌘G | Link / unlink clips |
| ⌥← / ⌥→ | Nudge the selected clips |
| Delete | Delete clips, or the selected range |
| ⌘Delete | Delete the range and close the gap |
| L | Loop on or off |
| ⇧⌘L | Loop the selected clips |
| ⇧M | Add a song marker |
| ⌘= / ⌘− / ⌘0 | Zoom in, out, to fit |
| ⌥⌘N | Add a track |
| ⌥⌘G / ⇧⌥⌘G | Group / ungroup tracks |
| ⌥⌘P / ⌥⌘S | Show projects / Sources |
| ⌘S / ⇧⌘S | Save a snapshot / Snapshots |
| ⌘E / ⇧⌘E | Save / Export Tracks |
| Esc | Deselect |
Player
| Return | Play the selected song |
|---|---|
| Delete | Remove from the playlist (in All Tracks, delete) |
| ⇧⌘E | Export the selected songs |
Troubleshooting
The recording is silent
Check that Echorie is turned on in System Settings ▸ Privacy & Security ▸ Screen & System Audio Recording, then quit and reopen Echorie. If only some apps are chosen in Record From, make sure the app you're playing is ticked. Some protected content records as silence by design.
The microphone picks up the music
Use headphones, so the microphone hears only you.
Shared playlists don't show up on my iPhone
Sign in to the same iCloud account on both devices and make sure iCloud is on for Echorie. Give new songs a moment: they're compressed and uploaded first, and each song shows its status on the Mac.
A clip shows “Missing audio”
Its recording is no longer in the library, for example after Clean Up removed it while no project used it. If it went to the Trash, drag the file from the Trash onto the timeline to import it again, then delete the missing clip.
My disk is filling up
Settings ▸ Storage shows what takes the space. Clean Up moves recordings no project uses to the Trash; deleting projects you no longer need also deletes the recordings only they use.
Getting help
Something not working, or an idea for Echorie? Write to us through the contact form; we read every message.